


User manual and frequently asked questions TURBOCUISINE MAXI FAST ELECTRIC PRESSURE COOKER 7.5L CE777
One twist, thousands of delicious recipes!
Your brand new solution for delicious meals in no time: With the TURBO CUISINE MAXI Fast Multicooker, Moulinex makes mouth-watering home cooking easier than ever. Whip up delicious, wholesome meals for the entire family with effortless automatic programs from starter to dessert and a pressure cooker mode for perfect results up to 3x faster*. Moulinex's exclusive spherical bowl technology ensures tender and juicy results, with an intuitive single control knob for a user-friendly appliance. (*Up to 3X faster cooking compared to traditional cookware using gas or electric stove)
Reference : CE777827
Voir les documents liés

Voir les questions les plus fr�quentes
FAQ
The application has rich content and requires a stable Wi-Fi connection to download correctly.
If your application does not download correctly, delete it and try to download again when you have a more stable Wi-Fi connection.
During initial installation, the download may take several minutes while the application saves all the photos on your Smartphone or tablet.
If your application does not download correctly, delete it and try to download again when you have a more stable Wi-Fi connection.
During initial installation, the download may take several minutes while the application saves all the photos on your Smartphone or tablet.
• Choose the "Search" tab in the navigation bar.
• Enter a word in the search field.
Tip: recipes are found using key words, so it is easier to enter a type of vegetable (e.g. carrot) rather than just vegetable.
• Enter a word in the search field.
Tip: recipes are found using key words, so it is easier to enter a type of vegetable (e.g. carrot) rather than just vegetable.
You must create an account and log in to your app to access this feature.
• Go to the recipe you wish to bookmark and select the bookmark logo in the top right corner.
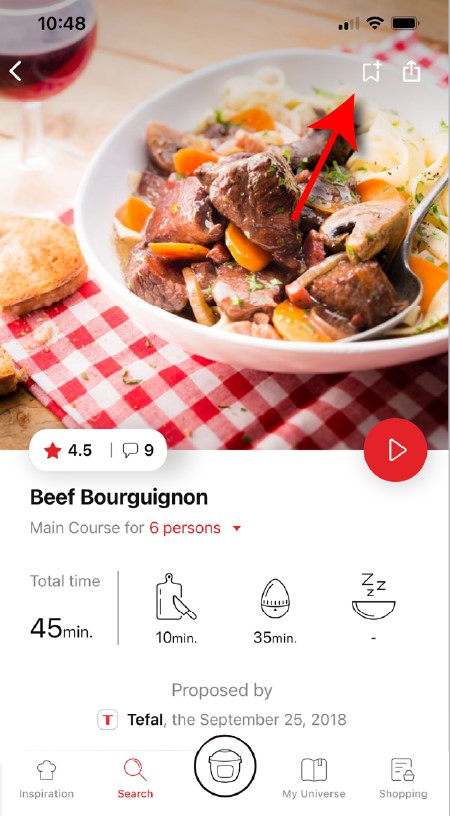
• A "My Notebooks" tab appears: select the "My Favorites" location.
• The recipe has been added.
• Go to the recipe you wish to bookmark and select the bookmark logo in the top right corner.
• A "My Notebooks" tab appears: select the "My Favorites" location.
• The recipe has been added.
You need to create an account and sign in to the application in order to access this feature.
Click the sharing logo to view the sharing options.
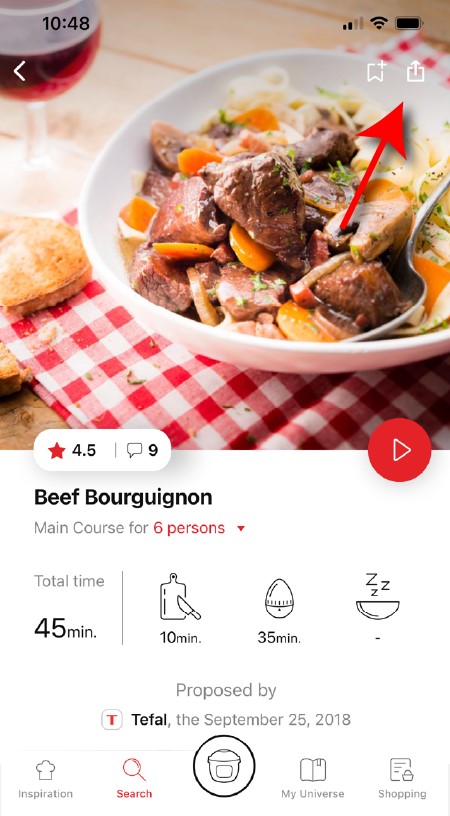
You can then choose how you would like to share this recipe.
Click the sharing logo to view the sharing options.
You can then choose how you would like to share this recipe.
Your application uses notifications to alert you at the end of cooking times using a beep.
If you want to turn off this signal, simply deactivate it in your tablet or Smartphone.
You may also disable sounds in the parameter settings for notifications on your telephone or tablet.
If you want to turn off this signal, simply deactivate it in your tablet or Smartphone.
You may also disable sounds in the parameter settings for notifications on your telephone or tablet.
 Cookies are used for audience measurement and personalization to help us improve your use of the product.
Audience measurement solutions allow us to analyze traffic, trends, usage and identify malfunctions in order to improve your experience.
Personalization solutions allow us to improve the quality of the information and services we provide and make your experience more enjoyable.
You can accept or deny the use of cookies when you first launch your device.
Your application uses notifications to alert you when your cooking is finished but also to let you know when new content (information, recipe...) is available.
If you wish, you can disable them from your smartphone settings.
If you wish, you can disable them from your smartphone settings.
You can choose not to accept cookies.
However, the grey cookies banner will remain on your screen as long as you do not click on "accept".
However, the grey cookies banner will remain on your screen as long as you do not click on "accept".
You must create an account and log in to your app to access these features.
Once logged in, you will be able to read the comments and see the notes that community members have given to the recipe by clicking on the notes/comments area.
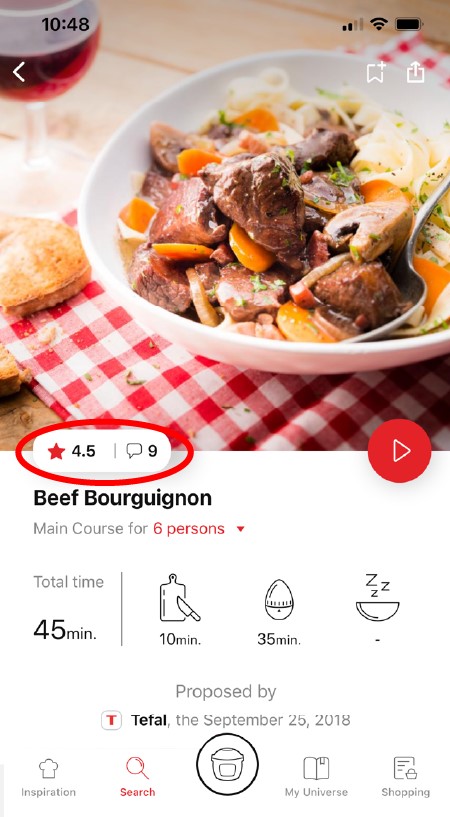
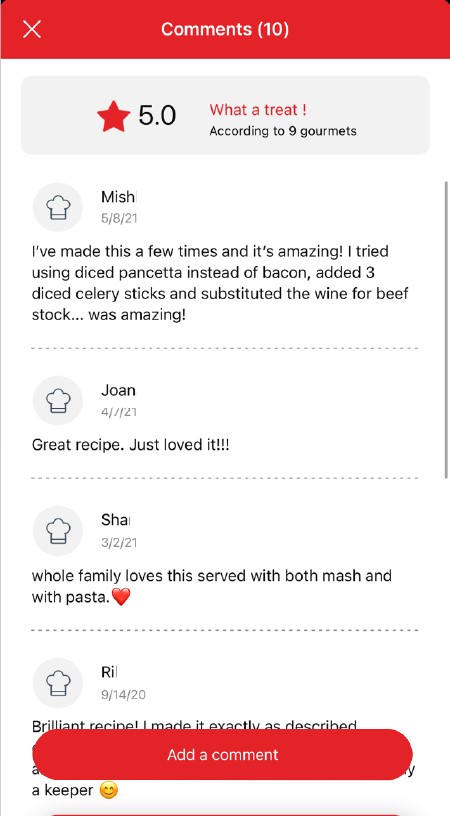
Once logged in, you will be able to read the comments and see the notes that community members have given to the recipe by clicking on the notes/comments area.
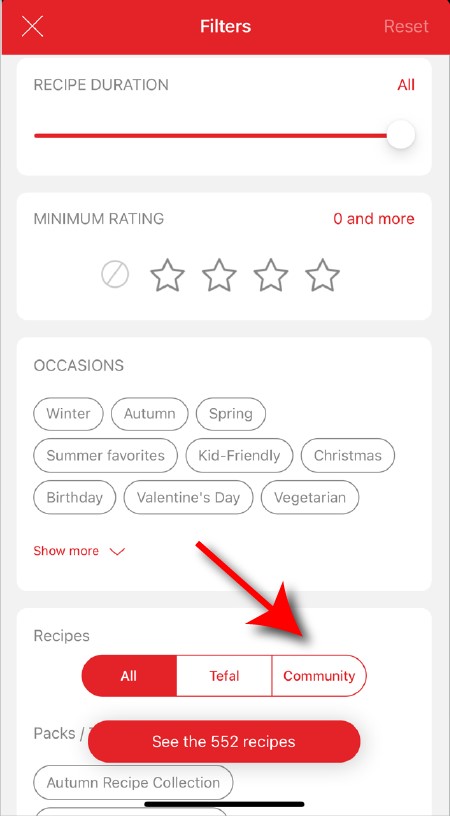
Once you have completed your search, specific filters make it easier for you to find the recipes that meet your needs.
The customizable filter:
• Click on "Filter" in order to sort the recipes according to the type of dish (starter, main course, dessert), the time it takes to make the recipe, the minimum rating, their themes (or packs)...
• You can also choose to select only the recipes of the brand or the recipes proposed by the community.
Sorting recipes:
Once you have made a search, you can sort your recipes by popularity, rating, age or alphabetical order.
You must create an account and log in to your app to access this feature.
• Choose the "My Universe" tab in the navigation bar.
• There, you will find your recipe booklets and can create new ones by clicking on "New booklet".
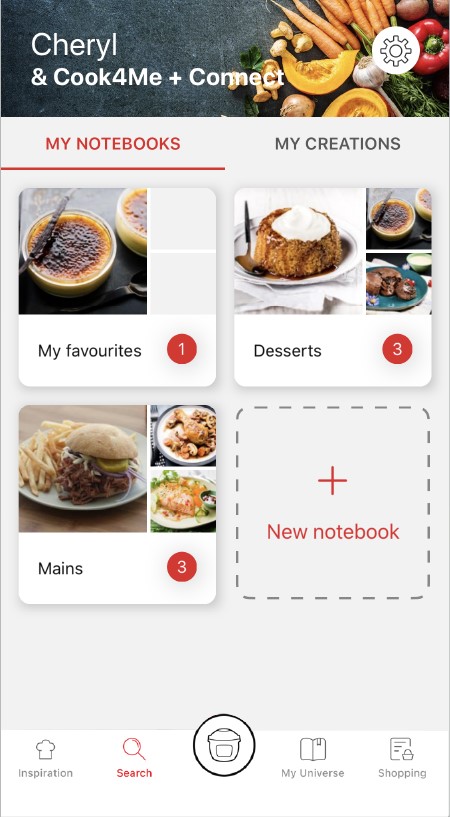
• Choose the "My Universe" tab in the navigation bar.
• There, you will find your recipe booklets and can create new ones by clicking on "New booklet".
You must create an account and log in to your app to access these features.
Once logged into your account, you will be able to rate the recipe and add a comment by following the instructions that appear on the screen after clicking on the notes/comments space.
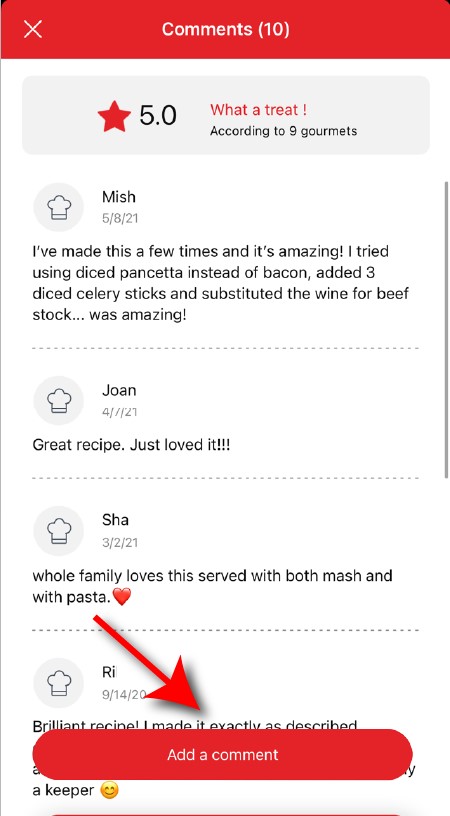
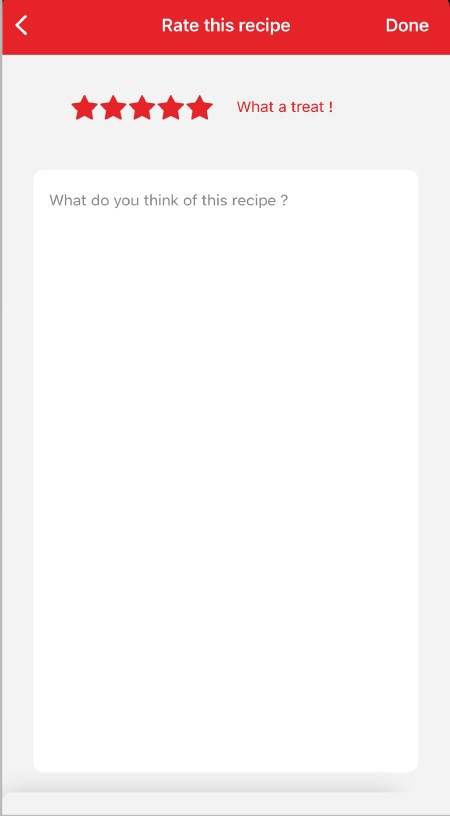
Once logged into your account, you will be able to rate the recipe and add a comment by following the instructions that appear on the screen after clicking on the notes/comments space.
Choose the "My Universe" tab in the navigation bar, then select the booklet you wish to modify or delete. Click on the pencil at the top right of the screen, then select the action you are looking for ("Delete booklet", "Rename booklet" or "Delete recipes").
When using the search function, select "Filter recipes".
In the "Recipes" section, select "Community" only.
You will then be able to see the recipes from the community.
In the "Recipes" section, select "Community" only.
You will then be able to see the recipes from the community.
• In "My universe", select "My profile".
• Click on the image of the registered product.
• Click on "Remove the product". The app will then ask you to select a product.
• Click on the image of the registered product.
• Click on "Remove the product". The app will then ask you to select a product.
It is important to select your product in the app in order to find the right recipes for that product. This way, the app will suggest hundreds of ideal recipes.
It will also let you add your accessories and access the associated recipes.
It will also let you add your accessories and access the associated recipes.
• Choose the "Search" tab in the navigation bar.
• Enter a word in the search field.
Tip: recipes are found using key words, so it is easier to enter a type of vegetable (e.g. carrot) rather than just vegetable.
• Enter a word in the search field.
Tip: recipes are found using key words, so it is easier to enter a type of vegetable (e.g. carrot) rather than just vegetable.
You must create an account and log in to your app to access this feature.
• Go to the recipe you wish to bookmark and select the bookmark logo in the top right corner.
• A "My Notebooks" tab appears: select the "My Favorites" location.
• The recipe has been added.
• Go to the recipe you wish to bookmark and select the bookmark logo in the top right corner.
• A "My Notebooks" tab appears: select the "My Favorites" location.
• The recipe has been added.
You need to create an account and sign in to the application in order to access this feature.
Click the sharing logo to view the sharing options.
You can then choose how you would like to share this recipe.
Click the sharing logo to view the sharing options.
You can then choose how you would like to share this recipe.
The application has rich content and requires a stable Wi-Fi connection to download correctly.
If your application does not download correctly, delete it and try to download again when you have a more stable Wi-Fi connection.
During initial installation, the download may take several minutes while the application saves all the photos on your Smartphone or tablet.
If your application does not download correctly, delete it and try to download again when you have a more stable Wi-Fi connection.
During initial installation, the download may take several minutes while the application saves all the photos on your Smartphone or tablet.
Your application uses notifications to alert you at the end of cooking times using a beep.
If you want to turn off this signal, simply deactivate it in your tablet or Smartphone.
You may also disable sounds in the parameter settings for notifications on your telephone or tablet.
If you want to turn off this signal, simply deactivate it in your tablet or Smartphone.
You may also disable sounds in the parameter settings for notifications on your telephone or tablet.
Your application uses notifications to alert you when your cooking is finished but also to let you know when new content (information, recipe...) is available.
If you wish, you can disable them from your smartphone settings.
If you wish, you can disable them from your smartphone settings.
You can choose not to accept cookies.
However, the grey cookies banner will remain on your screen as long as you do not click on "accept".
However, the grey cookies banner will remain on your screen as long as you do not click on "accept".
Cookies are used for audience measurement and personalization to help us improve your use of the product.Audience measurement solutions allow us to analyze traffic, trends, usage and identify malfunctions in order to improve your experience.
Personalization solutions allow us to improve the quality of the information and services we provide and make your experience more enjoyable.
You can accept or deny the use of cookies when you first launch your device.
You must create an account and log in to your app to access these features.
Once logged into your account, you will be able to rate the recipe and add a comment by following the instructions that appear on the screen after clicking on the notes/comments space.
Once logged into your account, you will be able to rate the recipe and add a comment by following the instructions that appear on the screen after clicking on the notes/comments space.
When using the search function, select "Filter recipes".
In the "Recipes" section, select "Community" only.
You will then be able to see the recipes from the community.
In the "Recipes" section, select "Community" only.
You will then be able to see the recipes from the community.
Once you have completed your search, specific filters make it easier for you to find the recipes that meet your needs.
The customizable filter:
• Click on "Filter" in order to sort the recipes according to the type of dish (starter, main course, dessert), the time it takes to make the recipe, the minimum rating, their themes (or packs)...
• You can also choose to select only the recipes of the brand or the recipes proposed by the community.
Sorting recipes:
Once you have made a search, you can sort your recipes by popularity, rating, age or alphabetical order.
The customizable filter:
• Click on "Filter" in order to sort the recipes according to the type of dish (starter, main course, dessert), the time it takes to make the recipe, the minimum rating, their themes (or packs)...
• You can also choose to select only the recipes of the brand or the recipes proposed by the community.
Sorting recipes:
Once you have made a search, you can sort your recipes by popularity, rating, age or alphabetical order.
You must create an account and log in to your app to access these features.
Once logged in, you will be able to read the comments and see the notes that community members have given to the recipe by clicking on the notes/comments area.
Once logged in, you will be able to read the comments and see the notes that community members have given to the recipe by clicking on the notes/comments area.
You must create an account and log in to your app to access this feature.
• Choose the "My Universe" tab in the navigation bar.
• There, you will find your recipe booklets and can create new ones by clicking on "New booklet".
• Choose the "My Universe" tab in the navigation bar.
• There, you will find your recipe booklets and can create new ones by clicking on "New booklet".
Choose the "My Universe" tab in the navigation bar, then select the booklet you wish to modify or delete. Click on the pencil at the top right of the screen, then select the action you are looking for ("Delete booklet", "Rename booklet" or "Delete recipes").
It is important to select your product in the app in order to find the right recipes for that product. This way, the app will suggest hundreds of ideal recipes.
It will also let you add your accessories and access the associated recipes.
It will also let you add your accessories and access the associated recipes.
• In "My universe", select "My profile".
• Click on the image of the registered product.
• Click on "Remove the product". The app will then ask you to select a product.
• Click on the image of the registered product.
• Click on "Remove the product". The app will then ask you to select a product.
There is no standby mode on your product. To stop a program anytime during the cooking process, press the start / stop button for 3 seconds.
If you are not planning to use your appliance within the next hour, simply unplug it.
If you are not planning to use your appliance within the next hour, simply unplug it.
- Rotative knob: you can switch from one program to another by turning the rotative knob and launch the program by short-pressing the start / stop button.
- To stop a program anytime during the cooking, you just need to press the start / stop button during 3 seconds.
- To adjust the temperature or the time of your program, first turn the rotative knob to select your program, then press the thermometer or timer buttons to adjust the settings. Turn the knob to the right to increase the cooking time or temperature, turn the knob to the left to decrease (if "Auto" is displayed on the screen, it means that the program's temperature or time are already optimized and therefore are not adjustable). When the temperature and time are adjusted to your desire, you can launch the cooking program by pressing the start / stop button.
- To launch a delayed start, turn the rotative knob to select your program, adjust your temperature and time if needed, and press the button showing a little clock on the top right of the panel to set a delayed start. The small orange light lights on to indicate that the delayed start is on. Turn the knob to adjust the delayed start duration, and then press the start / stop button to launch the cooking program. The cooking phase will start when the delayed start time has elapsed.
Wipe the bottom of the cooking bowl.
Make sure there is no food or liquid residue under the bowl or on the heating plate.
Then place the bowl into the appliance.
Never use the appliance without the cooking bowl.
Note: When using your appliance for the first time, the bowl may release a slight odour. This is normal.
Make sure there is no food or liquid residue under the bowl or on the heating plate.
Then place the bowl into the appliance.
Never use the appliance without the cooking bowl.
Note: When using your appliance for the first time, the bowl may release a slight odour. This is normal.
To use the Turbo Crisp lid, follow the below steps:
1. Plug the Turbo Crisp lid to a wall socket.
2. Place your ingredients into the pot.
3. Place the Turbo Crisp lid on the pot.
4. To begin cooking, select an automatic cooking mode or choose manual mode.
1. Plug the Turbo Crisp lid to a wall socket.
2. Place your ingredients into the pot.
3. Place the Turbo Crisp lid on the pot.
4. To begin cooking, select an automatic cooking mode or choose manual mode.
You can choose among 4 automatic cooking modes:
• Roast
• Grill
• Air-fry
• Bake
To do so, press the [Menu] button until you reach the desired cooking mode.
Then confirm the cooking mode by pressing the [Start] button to start cooking.
• Roast
• Grill
• Air-fry
• Bake
To do so, press the [Menu] button until you reach the desired cooking mode.
Then confirm the cooking mode by pressing the [Start] button to start cooking.
When choosing the Manual mode, you can adjust the temperature and cooking time:
1. Adjust the temperature by pressing the [Time/Temperature] icon, then use the [+] and [-] buttons on the screen. The temperature range is from 70 to 200°C.
2. Then set the cooking time by pressing the [Time/Temperature] icon and adjust the time using the [+] and [-] buttons on the screen. The cooking time range is from 0 to 60 minutes.
3. Press the [Start] button to begin cooking. The remaining cooking time will be displayed on the screen.
This function is not available for all cooking modes or for all preparations.
This is intentional to prevent possible bacterial growth that is undesirable for your health.
This is intentional to prevent possible bacterial growth that is undesirable for your health.
• The filling level of the bowl must never exceed the MAX level.
• For food that may expand during cooking (rice, seeds, lentils, peas, etc.), do not fill the bowl beyond half its maximum capacity.
• The bowl should always be filled with a minimum of 200 ml of liquid.
! Don't put your hands near the steam exhaust!
It is possible that a slight flow of steam may escape from the back of the appliance during cooking.
• The required amount of water varies depending on the recipe and cooking time.
• Always use a minimum of 200 ml of liquid.
• Place the steam basket in the bowl and make sure that the food does not touch the lid.
! Do not put your hands near the steam exhaust!
It is possible that a slight flow of steam may escape from the back of the appliance during decompression phase.
• Always use a minimum of 200 ml of liquid.
• Place the steam basket in the bowl and make sure that the food does not touch the lid.
! Do not put your hands near the steam exhaust!
It is possible that a slight flow of steam may escape from the back of the appliance during decompression phase.
The amount of ingredients should never exceed the MAX level. When you are cooking conventionally, the lid must always be open.
Do not use your appliance. To avoid any danger, have it replaced by an approved repair centre.
• Check that the silicone gasket is properly placed.
• Check that the lid is in proper position for closing (align the small arrow and lock the lid clockwise).
• Check for foreign bodies between the bowl and the heating plate. Remove the bowl and check that the heating plate, the central element and the underside of the bowl are clean. Also check that the central element can move freely.
• The bowl may be deformed (after an impact, fall...). The bowl must be changed at an authorised service centre.
• This is normal, the odour will disappear completely after a few uses.
• For a quick removal of the smell, you can put 0.5 liter of water, one cup of white vinegar and 2 slices of lemon in the cooking bowl, and launch a steam program for 10 minutes.
• Be sure to thoroughly clean the items listed in the instructions: cooking vessel, metal lid, before re-using your appliance.
• Check that there is no cooking in progress.
• Check that the pressure is fully released by pressing the pressure release button.
• Unplug the product and wait until it cools completely.
• Check that the pressure is fully released by pressing the pressure release button.
• Unplug the product and wait until it cools completely.
Make sure that the power cable is connected to both your device and the mains power supply.
If the problem persists, take your device to an authorized service centre.
If the problem persists, take your device to an authorized service centre.
• The silicone gasket in the lid is not in the proper position. In this case, let the appliance fully cool down, check the silicone gasket position, replace it properly if needed.
• The safety valve and pressure release valve may be clogged, or not in the proper position. In this case, let the appliance fully cool down, check the valves position and make sure they are clean, then replace it properly.
• If the problem persists after this check, take your product to an approved service centre.
If an error code appears (example: E0, E1, E2), you can refer to your product's manual for more information.
Check with the help of the user manual that all parts are securely placed (silicone gasket, safety valve and pressure release valve).
The lid is not in the proper position. According to the cooking program selected, the lid needs to be fully locked, closed but not locked, or fully opened. Please refer to your user manual to check which lid position is suitable for each cooking program.
1. Make sure that the power cable is connected to the power supply.
2. If the product is powered, unplug the power cord for 10 - 15 seconds and then plug it back in.
If the problem persists, contact our customer service or take your device to an approved service centre.
2. If the product is powered, unplug the power cord for 10 - 15 seconds and then plug it back in.
If the problem persists, contact our customer service or take your device to an approved service centre.
The grid is made of stainless steel and can be washed in the dishwasher without risk.
Yes, the grid is compatible with all cooking modes of the Extra Crisp and Turbo Crisp accessories.
The grid can be placed in the bowl:
• either in low position to raise your food for better air circulation.
• either in high position to have 2 cooking levels, one at the bottom of the bowl, and one on the grid.
• either in low position to raise your food for better air circulation.
• either in high position to have 2 cooking levels, one at the bottom of the bowl, and one on the grid.
The grid is compatible with all the built-in cooking modes of our multicookers, including pressure cooking.
The grid is compatible with multicookers of 5.8L capacity and more (list of compatible models).
There are recipes specially written with the 2in1 grid accessory directly in the app. When searching, you can filter based on the accessory.
You can also use the grid for manual cooking without any problem.
You can also use the grid for manual cooking without any problem.
The grid can handle a maximum weight of 1.2kg.
The grid must be installed in the bowl before placing the ingredients there.
Food will not be stable on the grid if you use it outside the bowl.
Food will not be stable on the grid if you use it outside the bowl.
We advise you to let the grid cool before handling it, or to use potholders to take it from the bowl.
If the grid is still hot, place it on a heat-resistant surface.
If the grid is still hot, place it on a heat-resistant surface.
After cooking, remove the ingredients that have cooked on the grid.
You can then take the hot grid from the bowl using potholders.
You can then take the hot grid from the bowl using potholders.
No, the grid is not microwave compatible.
The grid can only be used in multicookers with a capacity of 5.8L and above.
The grid can only be used in multicookers with a capacity of 5.8L and above.
We advise you not to use the grid and throw it into a sorting bin.
Take your device to a recycling center or waste disposal facility.
If you believe a part is missing, please contact our customer service center and we will help you find an appropriate solution.
Please go to the “Accessories” section of the website to easily find whatever you need for your product.
Find more detailed information in the Guarantee section of this website.
See the services


